React Native图像映射器在图像上创建可点击区域
在这篇文章中,我们将看到 React Native 中的图像映射器。 在图像映射器的帮助下,您可以在图像上创建可单击区域。 图像映射器的一个简单示例是,如果您有一个显示任何组织的层次结构的图像,并且希望任何用户重定向到与层次结构项目相关的详细信息,那么您可以使用图像映射器创建可单击并单击的区域在该区域中,您可以将用户重定向到您想要的任何地方。
你可以看到 HTML 图像映射 为了更好的理解。
推荐:在React Native的本机文件查看器中查看文件
React Native 中的图像映射器示例概述
在此示例中,我们将使用 ImageMapper 组件代替 Image 组件来加载图像。 这 ImageMapper 组件有一个 imgMap prop 为我们提供了传递地图的选项。 当我们在组件中传递地图时,它会使用映射器加载图像。 为了处理映射区域上的任何点击,我们创建了mapperAreaClickHandler并将其传入 onPress 支柱。
您可以在谷歌上搜索“图像映射生成器”来创建图像映射
制作 React Native 应用程序
React Native 入门将帮助您更多地了解如何制作 React Native 项目。 我们将使用 React Native 命令行界面来制作我们的 React Native 应用程序。
如果您之前安装了全局的react-native-cli软件包,请将其删除,因为它可能会导致意外问题:
npm uninstall -g react-native-cli @react-native-community/cli运行以下命令创建一个新的 React Native 项目
npx react-native init ProjectName如果你想使用特定的 React Native 版本启动一个新项目,你可以使用 –version 参数:
npx react-native init ProjectName --version X.XX.X注意如果上述命令失败,您可能使用的是旧版本 react-native 或者 react-native-cli 在您的电脑上全局安装。 尝试卸载 cli 并使用 npx 运行 cli。
这将在项目目录中创建一个带有名为 App.js 的索引文件的项目结构。
安装依赖
使用 ImageMapper 我们需要安装的组件 react-native-image-mapper 依赖项并使用以下命令将其安装到您的项目中
cd ProjectName运行以下命令
npm install react-native-image-mapper --save代码
现在在任何代码编辑器中打开 App.js 并将代码替换为以下代码
应用程序.js
// Image Mapper in React Native to Create Clickable Areas on Image
// https://aboutreact.com/react-native-image-mapper/

// Import React
import React, { useState } from 'react';
// Import Required Components
import { View, Text } from 'react-native';

//Import ImageMapper Component
import ImageMapper from 'react-native-image-mapper';

const getRandomColor = () => {
  //Function to return random color
  //To highlight the mapping area
  const letters="0123456789ABCDEF";
  let color="#";
  for (var i = 0; i < 6; i++)
    color += letters(Math.floor(Math.random() * 16));
  return color;
};

const App = () => {
  //State for the selected area
  const (selectedAreaId, setSelectedAreaId) = useState(());

  const mapperAreaClickHandler = async (item, idx, event) => {
    const currentSelectedAreaId = selectedAreaId;
    if (Array.isArray(currentSelectedAreaId)) {
      const indexInState = currentSelectedAreaId.indexOf(item.id);
      if (indexInState !== -1) {
        console.log('Removing id', item.id);
        setSelectedAreaId((
          ...currentSelectedAreaId.slice(0, indexInState),
          ...currentSelectedAreaId.slice(indexInState + 1),
        ));
      } else {
        alert(`Clicked Item Id: ${item.id}`);
        console.log('Setting Id', item.id);
        setSelectedAreaId((...currentSelectedAreaId, item.id));
      }
    } else {
      if (item.id === currentSelectedAreaId) {
        setSelectedAreaId(null);
      } else {
        setSelectedAreaId(item.id);
      }
    }
  };

  return (
    <View style={{ flex: 1, alignItems: 'center', padding: 30 }}>
      <Text
        style={{
          fontSize: 30,
          textAlign: 'center',
          marginTop: 40
        }}>
        Image Mapper Example in React Native
      </Text>
      <Text
          style={{
            fontSize: 25,
            marginTop: 20,
            marginBottom: 30,
            textAlign: 'center',
          }}>
          www.aboutreact.com
        </Text>
      <ImageMapper
        imgHeight={551}
        imgWidth={244}
        imgSource={{
          uri:
            'https://raw.githubusercontent.com/msalo3/react-native-image-mapper/master/Examples/human.png',
        }}
        imgMap={RECTANGLE_MAP}
        onPress={
          (item, idx, event) =>
            mapperAreaClickHandler(item, idx, event)
        }
        containerStyle={{ top: 10 }}
        selectedAreaId={selectedAreaId}
        multiselect
      />
    </View>
  );

};

export default App;

// Maps to Create Clickable Areas
const RECTANGLE_MAP = (
  {
    id: '0',
    name: 'Left Foot',
    shape: 'rectangle',
    x2: 110,
    y2: 540,
    x1: 80,
    y1: 500,
    prefill: getRandomColor(),
    fill: 'blue',
  },
  {
    id: '1',
    name: 'Right Foot',
    shape: 'rectangle',
    x2: 155,
    y2: 540,
    x1: 125,
    y1: 500,
    prefill: getRandomColor(),
    fill: 'blue',
  },
  {
    id: '2',
    name: 'Left Knee',
    shape: 'rectangle',
    x2: 110,
    y2: 400,
    x1: 80,
    y1: 370,
    prefill: getRandomColor(),
    fill: 'blue',
  },
  {
    id: '3',
    name: 'Right Knee',
    shape: 'rectangle',
    x2: 155,
    y2: 400,
    x1: 125,
    y1: 370,
    prefill: getRandomColor(),
    fill: 'blue',
  },
  {
    id: '4',
    name: 'Stomach',
    shape: 'rectangle',
    x2: 155,
    y2: 240,
    x1: 80,
    y1: 165,
    prefill: getRandomColor(),
    fill: 'blue',
  },
  {
    id: '5',
    name: 'Left Hand',
    shape: 'rectangle',
    x2: 40,
    y2: 315,
    x1: 5,
    y1: 250,
    prefill: getRandomColor(),
    fill: 'blue',
  },
  {
    id: '6',
    name: 'Right Hand',
    shape: 'rectangle',
    x2: 235,
    y2: 315,
    x1: 200,
    y1: 250,
    prefill: getRandomColor(),
    fill: 'blue',
  },
  {
    id: '7',
    name: 'Face',
    shape: 'rectangle',
    x2: 145,
    y2: 70,
    x1: 90,
    y1: 30,
    prefill: getRandomColor(),
    fill: 'blue',
  },
  {
    id: '8',
    name: 'Head',
    shape: 'rectangle',
    x2: 145,
    y2: 30,
    x1: 90,
    y1: 0,
    prefill: getRandomColor(),
    fill: 'blue',
  },
);
运行 React Native 应用程序
再次打开终端并使用跳转到您的项目。
cd ProjectName1. 启动 Metro Bundler
首先,您需要启动 Metro,React Native 附带的 JavaScript 捆绑器。 要启动 Metro 捆绑程序,请运行以下命令
npx react-native start一旦您启动 Metro Bundler,它将永远在您的终端上运行,直到您将其关闭。 让 Metro Bundler 在自己的终端中运行。 打开一个新终端并运行该应用程序。
2.启动React Native应用程序
在 Android 虚拟设备或真实调试设备上运行项目
npx react-native run-android或在 iOS 模拟器上运行(仅限 macOS)
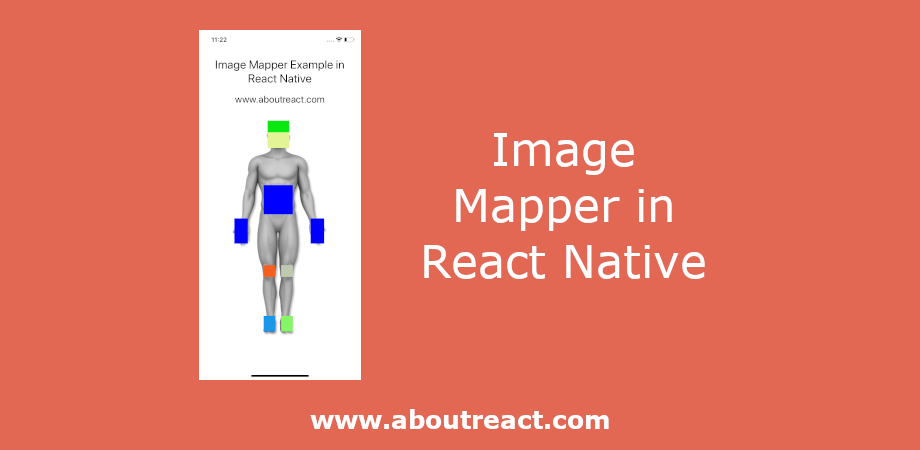
npx react-native run-ios输出截图


这就是 React Native 中的图像映射器,用于在图像上创建可点击区域。 如果您有任何疑问或想分享有关该主题的内容,您可以在下面发表评论或在此处联系我们。