在React Native应用程序中访问设备的联系人列表
在这个例子中,我们将看到如何在 React Native 中访问联系人列表。 在 React Native 中访问联系人列表非常简单 react-native-contacts 图书馆。 这个库提供了一个 Contacts 组件可以帮助您访问联系人列表、添加或更新任何联系人并可以打开联系人菜单。 以下是该库提供的 API 列表
getAllPromise<Contact()> – 返回 全部 作为对象数组的联系人getAllWithoutPhotos– 与…一样getAll在 Android 上,但在 iOS 上,它不会返回联系人照片的 URI(因为创建图像的开销很大)getContactById(contactId)– 具有定义的 contactId 的联系人(如果不存在则为 null)getCount()– 联系人数量getPhotoForId(contactId)– 联系人照片的 URI(或 null)addContact(联系人) – 将联系人添加到地址簿。openContactForm(contact) – 创建一个新联系人并显示在contactsUI中。openExistingContact(contact) – 其中 contact 是具有有效 recordID 的对象updateContact(contact) – 其中 contact 是具有有效 recordID 的对象deleteContact(contact) – 其中 contact 是具有有效 recordID 的对象getContactsMatchingString(string) – 其中 string 是与名称(名字、中间名、家庭)匹配的任何字符串getContactsByPhoneNumber(string) – 其中 string 是要匹配的电话号码。getContactsByEmailAddress(string) – 其中 string 是要匹配的电子邮件地址。checkPermission() – 检查访问联系人的权限 仅限 iOSrequestPermission() – 请求访问通讯录的权限 仅限 iOSwritePhotoToPath() – 将联系人照片写入给定路径 仅限安卓
推荐:修复Windows 11 OBS Studio无法录制音频
访问联系人列表
在此示例中,我们将仅讨论 React Native 应用程序中设备联系人的列表。 这是帮助我们访问联系人列表的代码片段。
Contacts.getAll()
    .then(contacts => {
        contacts.sort((a, b) =>
           a.givenName.toLowerCase() > b.givenName.toLowerCase()
        );
        setContacts(contacts);
    })
    .catch(e => {
        alert('Permission to access contacts was denied');
        console.warn('Permission to access contacts was denied');
    });
我使用了 getAll API,它将立即提供所有联系人列表。 getAll 是一个数据库密集型过程,可能需要很长时间才能完成,具体取决于联系人列表的大小。 因此,建议您访问 getAll 在需要之前调用方法,并缓存结果以供将来使用。
项目概况
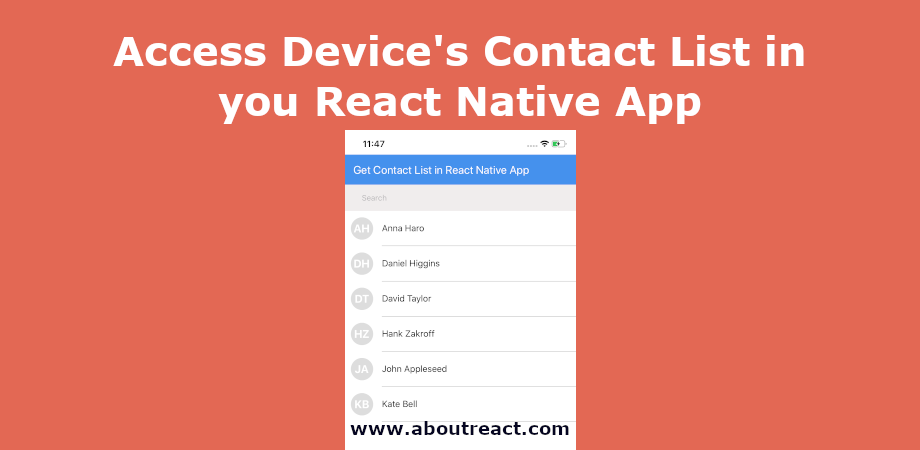
在此示例中,我们将创建设备联系人列表,并使用搜索栏来过滤联系人,单击该联系人后,我们将在默认联系人菜单中打开该联系人。
屏幕启动后,我们将检查平台,如果是Android,我们将请求运行时权限,然后调用loadContacts函数,否则对于iOS,我们将直接调用loadContacts函数。 此 loadContacts 函数将访问设备的联系人列表,并提供与 Promise 相同的功能。 获取联系人后,我们将从 A 到 Z 对列表进行排序
contacts.sort((a, b) =>
  a.givenName.toLowerCase() > b.givenName.toLowerCase()
);
一旦我们准备好联系人列表,我们将在列表视图中呈现该列表。
我们还将有一个搜索栏,它将帮助我们从列表中搜索联系人。 用户可以通过手机号码或姓名进行搜索,为此,我们将分别使用 getContactsByPhoneNumber 和 getContactsMatchingString。 用户单击任何联系人后,我们将调用 openExistingContact API,该 API 将在默认联系人查看器中打开该联系人。 要打开任何现有的联系人,我们将使用
Contacts.openExistingContact(contact)我希望您现在知道我们要做什么。 现在让我们从示例开始。
制作 React Native 应用程序
React Native 入门将帮助您更多地了解如何制作 React Native 项目。 我们将使用 React Native 命令行界面来制作我们的 React Native 应用程序。
如果您之前安装了全局的react-native-cli软件包,请将其删除,因为它可能会导致意外问题:
npm uninstall -g react-native-cli @react-native-community/cli运行以下命令创建一个新的 React Native 项目
npx react-native init ProjectName如果你想使用特定的 React Native 版本启动一个新项目,你可以使用 –version 参数:
npx react-native init ProjectName --version X.XX.X注意如果上述命令失败,您可能使用的是旧版本 react-native 或者 react-native-cli 在您的电脑上全局安装。 尝试卸载 cli 并使用 npx 运行 cli。
这将在项目目录中创建一个带有名为 App.js 的索引文件的项目结构。
安装依赖
使用 Contacts 我们需要安装 react-native-contacts 包裹。 要安装它,请打开终端并跳入您的项目
cd ProjectName运行以下命令
npm install react-native-contacts --save该命令会将所有依赖项复制到您的node_module目录中,您可以在以下位置找到该目录 node_module 名为的目录 react-native-contacts。
CocoaPods 安装
请使用以下命令安装CocoaPods
npx pod-installAndroid 访问联系人列表的权限
我们正在访问设备的联系人列表,这是敏感信息,因此我们需要向 AndroidManifest.xml 文件。 请在 AndroidMnifest.xml 中添加以下权限。
去 YourProject -> android -> app -> main -> AndroidMnifest.xml
<uses-permission android:name="android.permission.WRITE_CONTACTS"/>
<uses-permission android:name="android.permission.READ_CONTACTS"/>| 允许 | 目的 |
|---|---|
| 写联系人 | 创建和更新设备的联系方式 |
| 读取联系人 | 读取设备的联系方式 |

有关权限的更多信息,您可以查看这篇文章。
iOS 访问联系人列表的权限
请按照以下步骤在iOS项目中添加访问联系人列表的权限。
打开项目 YourProject -> ios -> YourProject.xcworkspace 在 Xcode 中。
1. 在 Xcode 中打开项目后,单击左侧栏中的项目,您将在工作区中看到多个选项。
2. 选择信息选项卡 info.plist
3. 单击加号按钮添加权限键“隐私-联系人使用说明”以及弹出权限对话框时可见的值。

项目结构
例如,我们需要创建以下目录结构。 创建一个 components 目录然后创建2个文件名 Avatar.js 和 ListItem.js 在里面。

如果您已经创建了目录结构,那么您可以进入下一步以替换其中的代码。
在 React Native 中访问联系人列表的代码
应用程序.js
在任何代码编辑器中打开 App.js 并将代码替换为以下代码
// Access Device’s Contact List in React Native App
// https://aboutreact.com/access-contact-list-react-native/

// Import React
import React, {useState, useEffect} from 'react';

// Import all required component
import {
  PermissionsAndroid,
  Platform,
  SafeAreaView,
  StyleSheet,
  Text,
  View,
  FlatList,
  TextInput,
} from 'react-native';

import Contacts from 'react-native-contacts';
import ListItem from './components/ListItem';

const App = () => {
  let (contacts, setContacts) = useState(());

  useEffect(() => {
    if (Platform.OS === 'android') {
      PermissionsAndroid.request(
        PermissionsAndroid.PERMISSIONS.READ_CONTACTS, {
          title: 'Contacts',
          message: 'This app would like to view your contacts.',
        }).then(() => {
          loadContacts();
        }
      );
    } else {
      loadContacts();
    }
  }, ());

  const loadContacts = () => {
    Contacts.getAll()
      .then(contacts => {
        contacts.sort(
          (a, b) =>
          a.givenName.toLowerCase() > b.givenName.toLowerCase(),
        );
        setContacts(contacts);
      })
      .catch(e => {
        alert('Permission to access contacts was denied');
        console.warn('Permission to access contacts was denied');
      });
  };

  const search = (text) => {
    const phoneNumberRegex =
      /\b(\+)?(()?(0-9){2,6}())?(-\s\.)?(-\s\/\.0-9){3,15}\b/m;
    if (text === '' || text === null) {
      loadContacts();
    } else if (phoneNumberRegex.test(text)) {
      Contacts.getContactsByPhoneNumber(text).then(contacts => {
        contacts.sort(
          (a, b) =>
          a.givenName.toLowerCase() > b.givenName.toLowerCase(),
        );
        setContacts(contacts);
        console.log('contacts', contacts);
      });
    } else {
      Contacts.getContactsMatchingString(text).then(contacts => {
        contacts.sort(
          (a, b) =>
          a.givenName.toLowerCase() > b.givenName.toLowerCase(),
        );
        setContacts(contacts);
        console.log('contacts', contacts);
      });
    }
  };

  const openContact = (contact) => {
    console.log(JSON.stringify(contact));
    Contacts.openExistingContact(contact);
  };

  return (
    <SafeAreaView style={styles.container}>
      <View style={styles.container}>
        <Text style={styles.header}>
          Access Contact List in React Native
        </Text>
        <TextInput
          onChangeText={search}
          placeholder="Search"
          style={styles.searchBar}
        />
        <FlatList
          data={contacts}
          renderItem={(contact) => {
            {
              console.log('contact -> ' + JSON.stringify(contact));
            }
            return (
              <ListItem
                key={contact.item.recordID}
                item={contact.item}
                onPress={openContact}
              />
            );
          }}
          keyExtractor={(item) => item.recordID}
        />
      </View>
    </SafeAreaView>
  );
};
export default App;

const styles = StyleSheet.create({
  container: {
    flex: 1,
  },
  header: {
    backgroundColor: '#4591ed',
    color: 'white',
    paddingHorizontal: 15,
    paddingVertical: 15,
    fontSize: 20,
  },
  searchBar: {
    backgroundColor: '#f0eded',
    paddingHorizontal: 30,
    paddingVertical: Platform.OS === 'android' ? undefined : 15,
  },
});
ListItem.js
在任何代码编辑器中打开 Components/ListItem.js 并将代码替换为以下代码
// Access Device’s Contact List in React Native App
// https://aboutreact.com/access-contact-list-react-native/

import React, {memo} from 'react';
import {View, TouchableOpacity, Text, StyleSheet} from 'react-native';

import PropTypes from 'prop-types';
import Avatar from './Avatar';

const getAvatarInitials = (textString) => {
  if (!textString) return '';
  const text = textString.trim();
  const textSplit = text.split(' ');
  if (textSplit.length <= 1) return text.charAt(0);
  const initials =
    textSplit(0).charAt(0) + textSplit(textSplit.length - 1).charAt(0);
  return initials;
};

const ListItem = (props) => {
  const shouldComponentUpdate = () => {
    return false;
  };
  const {item, onPress} = props;
  return (
    <View>
      <TouchableOpacity onPress={() => onPress(item)}>
        <View style={styles.itemContainer}>
          <View style={styles.leftElementContainer}>
            <Avatar
              img={
                item.hasThumbnail ?
                  {uri: item.thumbnailPath} : undefined
              }
              placeholder={getAvatarInitials(
                `${item.givenName} ${item.familyName}`,
              )}
              width={40}
              height={40}
            />
          </View>
          <View style={styles.rightSectionContainer}>
            <View style={styles.mainTitleContainer}>
              <Text
                style={
                  styles.titleStyle
                }>{`${item.givenName} ${item.familyName}`}</Text>
            </View>
          </View>
        </View>
      </TouchableOpacity>
    </View>
  );
};

const styles = StyleSheet.create({
  itemContainer: {
    flexDirection: 'row',
    minHeight: 44,
    height: 63,
  },
  leftElementContainer: {
    justifyContent: 'center',
    alignItems: 'center',
    flex: 2,
    paddingLeft: 13,
  },
  rightSectionContainer: {
    marginLeft: 18,
    flexDirection: 'row',
    flex: 20,
    borderBottomWidth: StyleSheet.hairlineWidth,
    borderColor: '#515151',
  },
  mainTitleContainer: {
    justifyContent: 'center',
    flexDirection: 'column',
    flex: 1,
  },
  titleStyle: {
    fontSize: 16,
  },
});

export default memo(ListItem);

ListItem.propTypes = {
  item: PropTypes.object,
  onPress: PropTypes.func,
};
Avatar.js
在任何代码编辑器中打开 Components/Avatar.js 并将代码替换为以下代码
// Access Device’s Contact List in React Native App
// https://aboutreact.com/access-contact-list-react-native/

import React from 'react';
import {Image, View, Text, StyleSheet} from 'react-native';
import PropTypes from 'prop-types';

const Avatar = (props) => {
  const renderImage = () => {
    const {img, width, height, roundedImage} = props;
    const {imageContainer, image} = styles;

    const viewStyle = (imageContainer);
    if (roundedImage)
      viewStyle.push({borderRadius: Math.round(width + height) / 2});
    return (
      <View style={viewStyle}>
        <Image style={image} source={img} />
      </View>
    );
  };

  const renderPlaceholder = () => {
    const {placeholder, width, height, roundedPlaceholder} = props;
    const {placeholderContainer, placeholderText} = styles;

    const viewStyle = (placeholderContainer);
    if (roundedPlaceholder)
      viewStyle.push({borderRadius: Math.round(width + height) / 2});

    return (
      <View style={viewStyle}>
        <View style={viewStyle}>
          <Text
            adjustsFontSizeToFit
            numberOfLines={1}
            minimumFontScale={0.01}
            style={(
              {fontSize: Math.round(width) / 2},
              placeholderText
            )}>
            {placeholder}
          </Text>
        </View>
      </View>
    );
  };

  const {img, width, height} = props;
  const {container} = styles;
  return (
    <View style={(container, props.style, {width, height})}>
      {img ? renderImage() : renderPlaceholder()}
    </View>
  );
};

const styles = StyleSheet.create({
  container: {
    width: '100%',
  },
  imageContainer: {
    overflow: 'hidden',
    justifyContent: 'center',
    height: '100%',
  },
  image: {
    flex: 1,
    alignSelf: 'stretch',
    width: undefined,
    height: undefined,
  },
  placeholderContainer: {
    alignItems: 'center',
    justifyContent: 'center',
    backgroundColor: '#dddddd',
    height: '100%',
  },
  placeholderText: {
    fontWeight: '700',
    color: '#ffffff',
  },
});

Avatar.propTypes = {
  img: Image.propTypes.source,
  placeholder: PropTypes.string,
  width: PropTypes.number.isRequired,
  height: PropTypes.number.isRequired,
  roundedImage: PropTypes.bool,
  roundedPlaceholder: PropTypes.bool,
};

Avatar.defaultProps = {
  roundedImage: true,
  roundedPlaceholder: true,
};

export default Avatar;
运行 React Native 应用程序
再次打开终端并使用跳转到您的项目。
cd ProjectName1. 启动 Metro Bundler
首先,您需要启动 Metro,React Native 附带的 JavaScript 捆绑器。 要启动 Metro 捆绑程序,请运行以下命令
npx react-native start一旦您启动 Metro Bundler,它将永远在您的终端上运行,直到您将其关闭。 让 Metro Bundler 在自己的终端中运行。 打开一个新终端并运行该应用程序。
2.启动React Native应用程序
在 Android 虚拟设备或真实调试设备上运行项目
npx react-native run-android或在 iOS 模拟器上运行(仅限 macOS)
npx react-native run-ios输出截图
安卓


IOS
这是您在 React Native 应用程序中访问设备联系人列表的方法。 如果您有任何疑问或想分享有关该主题的内容,您可以在下面发表评论或在此处联系我们。