如何检测React Native应用程序的调用状态
在此示例中,您将了解如何检测 React Native App 中的调用状态。 此呼叫检测示例将帮助您检测不同的呼叫状态,例如 Incoming, Disconnected, Dialing 和 Connected 对于 iOS。 对于 android,这将给出以下状态, Offhook, Incoming, Disconnected 和 Missed。 如果是 Incoming 对于 Android,您还可以获取来电电话号码。
推荐:在React Native应用程序中访问设备的联系人列表
如何检测呼叫状态
对于呼叫状态检测,我们将使用react-native-call-detection库。 该库将提供以下活动
iOS 事件
- 连接的 – 呼叫已接通
- 已断开连接 – 通话已断开
- 拨号 – 当我们拨打号码时
- 传入 – 接到来电时
安卓事件
- 摘机 – 至少存在一个正在拨号、活动或保持的呼叫,并且没有呼叫振铃或等待。
- 已断开连接 – 通话已断开
- 传入 – 接到来电时
- 错过了 – 未接来电
这是帮助我们检测呼叫状态的代码片段
let callDetector = new CallDetectorManager(
  (event, number) => {
    console.log('event -> ', event + (number ? ' - ' + number : ''));
    var updatedCallStates = callStates;
    updatedCallStates.push(event + (number ? ' - ' + number : ''));
    setFlatListItems(updatedCallStates);
    setCallStates(updatedCallStates);

    // For iOS event will be either "Connected",
    // "Disconnected","Dialing" and "Incoming"

    // For Android event will be either "Offhook",
    // "Disconnected", "Incoming" or "Missed"
    // phoneNumber should store caller/called number

    if (event === 'Disconnected') {
        // Do something call got disconnected
    } else if (event === 'Connected') {
        // Do something call got connected
        // This clause will only be executed for iOS
    } else if (event === 'Incoming') {
        // Do something call got incoming
    } else if (event === 'Dialing') {
        // Do something call got dialing
        // This clause will only be executed for iOS
    } else if (event === 'Offhook') {
        //Device call state: Off-hook.
        // At least one call exists that is dialing,
        // active, or on hold,
        // and no calls are ringing or waiting.
        // This clause will only be executed for Android
    } else if (event === 'Missed') {
        // Do something call got missed
        // This clause will only be executed for Android
    }
  },
  true, // To read the phone number of the incoming call (ANDROID)
  () => {
    // If permission got denied (ANDROID)
    // Only If you want to read incoming number
    // Default: console.error
    console.log('Permission Denied by User');
  },
  {
    title: 'Phone State Permission',
    message:'This app needs access to your phone state',
  }
);
项目概况
在此示例中,我们将有一个按钮来启用和禁用 CallDetectorManager 有回调。 该检测器将密切关注调用活动,并在回调函数中提供事件。 在此回调函数中,我们将更新包含所有事件日志的列表的数据源。
我希望您现在知道我们要做什么。 现在让我们从示例开始。
制作 React Native 应用程序
React Native 入门将帮助您更多地了解如何制作 React Native 项目。 我们将使用 React Native 命令行界面来制作我们的 React Native 应用程序。
如果您之前安装了全局的react-native-cli软件包,请将其删除,因为它可能会导致意外问题:
npm uninstall -g react-native-cli @react-native-community/cli运行以下命令创建一个新的 React Native 项目
npx react-native init ProjectName如果你想使用特定的 React Native 版本启动一个新项目,你可以使用 –version 参数:
npx react-native init ProjectName --version X.XX.X注意如果上述命令失败,您可能使用的是旧版本 react-native 或者 react-native-cli 在您的电脑上全局安装。 尝试卸载 cli 并使用 npx 运行 cli。
这将在项目目录中创建一个带有名为 App.js 的索引文件的项目结构。
安装依赖
使用 CallDetectorManager 我们需要安装 react-native-call-detection 包裹。 要安装它,请打开终端并跳入您的项目
cd ProjectName运行以下命令
npm install react-native-call-detection --save该命令会将所有依赖项复制到您的node_module目录中,您可以在以下位置找到该目录 node_module 名为的目录 react-native-call-detection。
CocoaPods 安装
请使用以下命令安装CocoaPods
npx pod-install允许备份 Android 应用程序
这是一个依赖于库的配置,您只需为 Android 执行此操作。 这个库需要allowBackup选项在你的 AndroidManifest.xml 如此开放 YourProject/android/app/main/AndroidManifest.xml 并编辑 机器人:allowBackup =“假” 到 android:allowBackup=”true” 并保存它。

Android 访问联系人列表的权限
我们正在检测通话状态,这是敏感信息,因此我们需要向 AndroidManifest.xml 文件。 请在 AndroidMnifest.xml 中添加以下权限。
去 YourProject -> android -> app -> main -> AndroidMnifest.xml
<uses-permission android:name="android.permission.READ_PHONE_STATE"/>| 允许 | 目的 |
|---|---|
| READ_PHONE_STATE | 反应电话状态 |

有关权限的更多信息,您可以查看这篇文章。
检测呼叫状态的代码
应用程序.js
在任何代码编辑器中打开 App.js 并将代码替换为以下代码
// How to Detect Call States in React Native App
// https://aboutreact.com/detect-call-states/

//Import React
import React, {useState} from 'react';

//Import required component
import {
  StyleSheet,
  Text,
  View,
  TouchableOpacity,
  Linking,
  FlatList,
  SafeAreaView,
  Image,
} from 'react-native';

//Import Call Detector
import CallDetectorManager from 'react-native-call-detection';

const App = () => {
  //to keep callDetector reference
  let callDetector = undefined;

  let (callStates, setCallStates) = useState(());
  let (isStart, setIsStart) = useState(false);
  let (flatListItems, setFlatListItems) = useState(());

  const callFriendTapped = () => {
    Linking.openURL('tel:5555555555').catch((err) => {
      console.log(err);
    });
  };

  const startStopListener = () => {
    if (isStart) {
      console.log('Stop');
      callDetector && callDetector.dispose();
    } else {
      console.log('Start');
      callDetector = new CallDetectorManager(
        (event, number) => {
          console.log('event -> ',
            event + (number ? ' - ' + number : '')
          );
          var updatedCallStates = callStates;
          updatedCallStates.push(
            event + (number ? ' - ' + number : '')
          );
          setFlatListItems(updatedCallStates);
          setCallStates(updatedCallStates);

          // For iOS event will be either "Connected",
          // "Disconnected","Dialing" and "Incoming"

          // For Android event will be either "Offhook",
          // "Disconnected", "Incoming" or "Missed"
          // phoneNumber should store caller/called number

          if (event === 'Disconnected') {
            // Do something call got disconnected
          } else if (event === 'Connected') {
            // Do something call got connected
            // This clause will only be executed for iOS
          } else if (event === 'Incoming') {
            // Do something call got incoming
          } else if (event === 'Dialing') {
            // Do something call got dialing
            // This clause will only be executed for iOS
          } else if (event === 'Offhook') {
            //Device call state: Off-hook.
            // At least one call exists that is dialing,
            // active, or on hold,
            // and no calls are ringing or waiting.
            // This clause will only be executed for Android
          } else if (event === 'Missed') {
            // Do something call got missed
            // This clause will only be executed for Android
          }
        },
        true, // To detect incoming calls (ANDROID)
        () => {
          // If your permission got denied (ANDROID)
          // Only if you want to read incoming number
          // Default: console.error
          console.log('Permission Denied by User');
        },
        {
          title: 'Phone State Permission',
          message:
            'This app needs access to your phone state
             in order to react and/or to adapt to incoming calls.',
        },
      );
    }
    setIsStart(!isStart);
  };

  const listSeparator = () => {
    return (
      <View
        style={{
          height: 0.5,
          width: '100%',
          backgroundColor: '#ebebeb'
        }} />
    );
  };

  return (
    <SafeAreaView style={{flex: 1}}>
      <View style={styles.container}>
        <View style={styles.header}>
          <Text style={styles.headerTextLarge}>
            Example to detect call states
          </Text>
          <Text style={styles.headerText}>
            www.aboutreact.com
          </Text>
        </View>
        <FlatList
          style={{flex: 1}}
          data={flatListItems}
          ItemSeparatorComponent={listSeparator}
          renderItem={({item}) => (
            <View style={{flex: 1}}>
              <Text style={styles.callLogs}>
                {JSON.stringify(item)}
              </Text>
            </View>
          )}
          keyExtractor={(item, index) => index.toString()}
        />
        <TouchableOpacity
          style={styles.button}
          onPress={startStopListener}>
          <Text style={styles.buttonText}>
            {isStart ? 'Stop Listner' : 'Start Listener'}
          </Text>
        </TouchableOpacity>
        <TouchableOpacity
          activeOpacity={0.7}
          onPress={callFriendTapped}
          style={styles.fabStyle}>
          <Image
            source={{
              uri:
                'https://raw.githubusercontent.com/AboutReact/sampleresource/master/input_phone.png',
            }}
            style={styles.fabImageStyle}
          />
        </TouchableOpacity>
      </View>
    </SafeAreaView>
  );
};

export default App;

const styles = StyleSheet.create({
  container: {
    flex: 1,
    backgroundColor: '#F5FCFF',
  },
  header: {
    backgroundColor: '#ff8c21',
    padding: 10,
  },
  headerTextLarge: {
    textAlign: 'center',
    fontSize: 20,
    color: 'white',
  },
  headerText: {
    marginTop: 5,
    textAlign: 'center',
    fontSize: 18,
    color: 'white',
  },
  button: {
    alignItems: 'center',
    backgroundColor: '#ff8c21',
    padding: 10,
    justifyContent: 'center',
    height: 60,
    width: '100%',
  },
  buttonText: {
    textAlign: 'center',
    fontSize: 18,
    color: 'white',
  },
  callLogs: {
    padding: 16,
    fontSize: 16,
    color: '#333333',
  },
  fabStyle: {
    position: 'absolute',
    width: 60,
    height: 60,
    borderRadius: 60 / 2,
    alignItems: 'center',
    justifyContent: 'center',
    right: 30,
    bottom: 30,
    backgroundColor: 'yellow',
  },
  fabImageStyle: {
    resizeMode: 'contain',
    width: 20,
    height: 20,
  },
});
运行 React Native 应用程序
再次打开终端并使用跳转到您的项目。
cd ProjectName1. 启动 Metro Bundler
首先,您需要启动 Metro,React Native 附带的 JavaScript 捆绑器。 要启动 Metro 捆绑程序,请运行以下命令
npx react-native start一旦您启动 Metro Bundler,它将永远在您的终端上运行,直到您将其关闭。 让 Metro Bundler 在自己的终端中运行。 打开一个新终端并运行该应用程序。
2.启动React Native应用程序
在 Android 虚拟设备或真实调试设备上运行项目
npx react-native run-android或在 iOS 模拟器上运行(仅限 macOS)
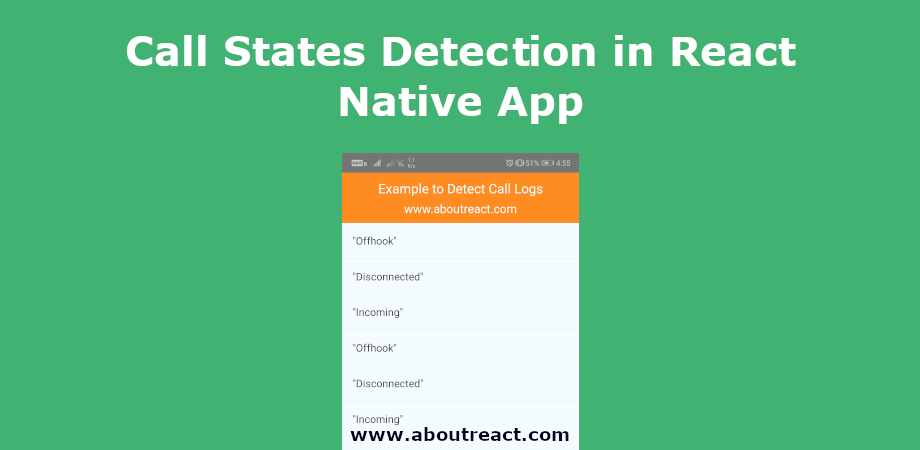
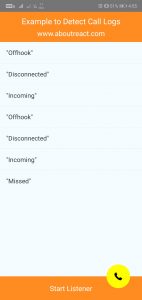
npx react-native run-ios输出截图
安卓


这是您在 React Native 中检测调用的方法。 如果您有任何疑问或想分享有关该主题的内容,您可以在下面发表评论或在此处联系我们。